Our patio is looking ever so beautiful this spring. We added pots of bulbs and perennials that are also blooming, and a gorgeous white camellia. Yes the camellia "sheds" and I find myself cleaning the spent petals daily, but I consider that a small price to pay for the beauty of this long-blooming, gorgeous tree.
Our camellia has a full peony type bloom with ruffled petals and bright yellow stamens that peek out through the petals.
Added to the apricot tree and Meyer lemon, we have the beginnings of a small forest on our tiny patio.
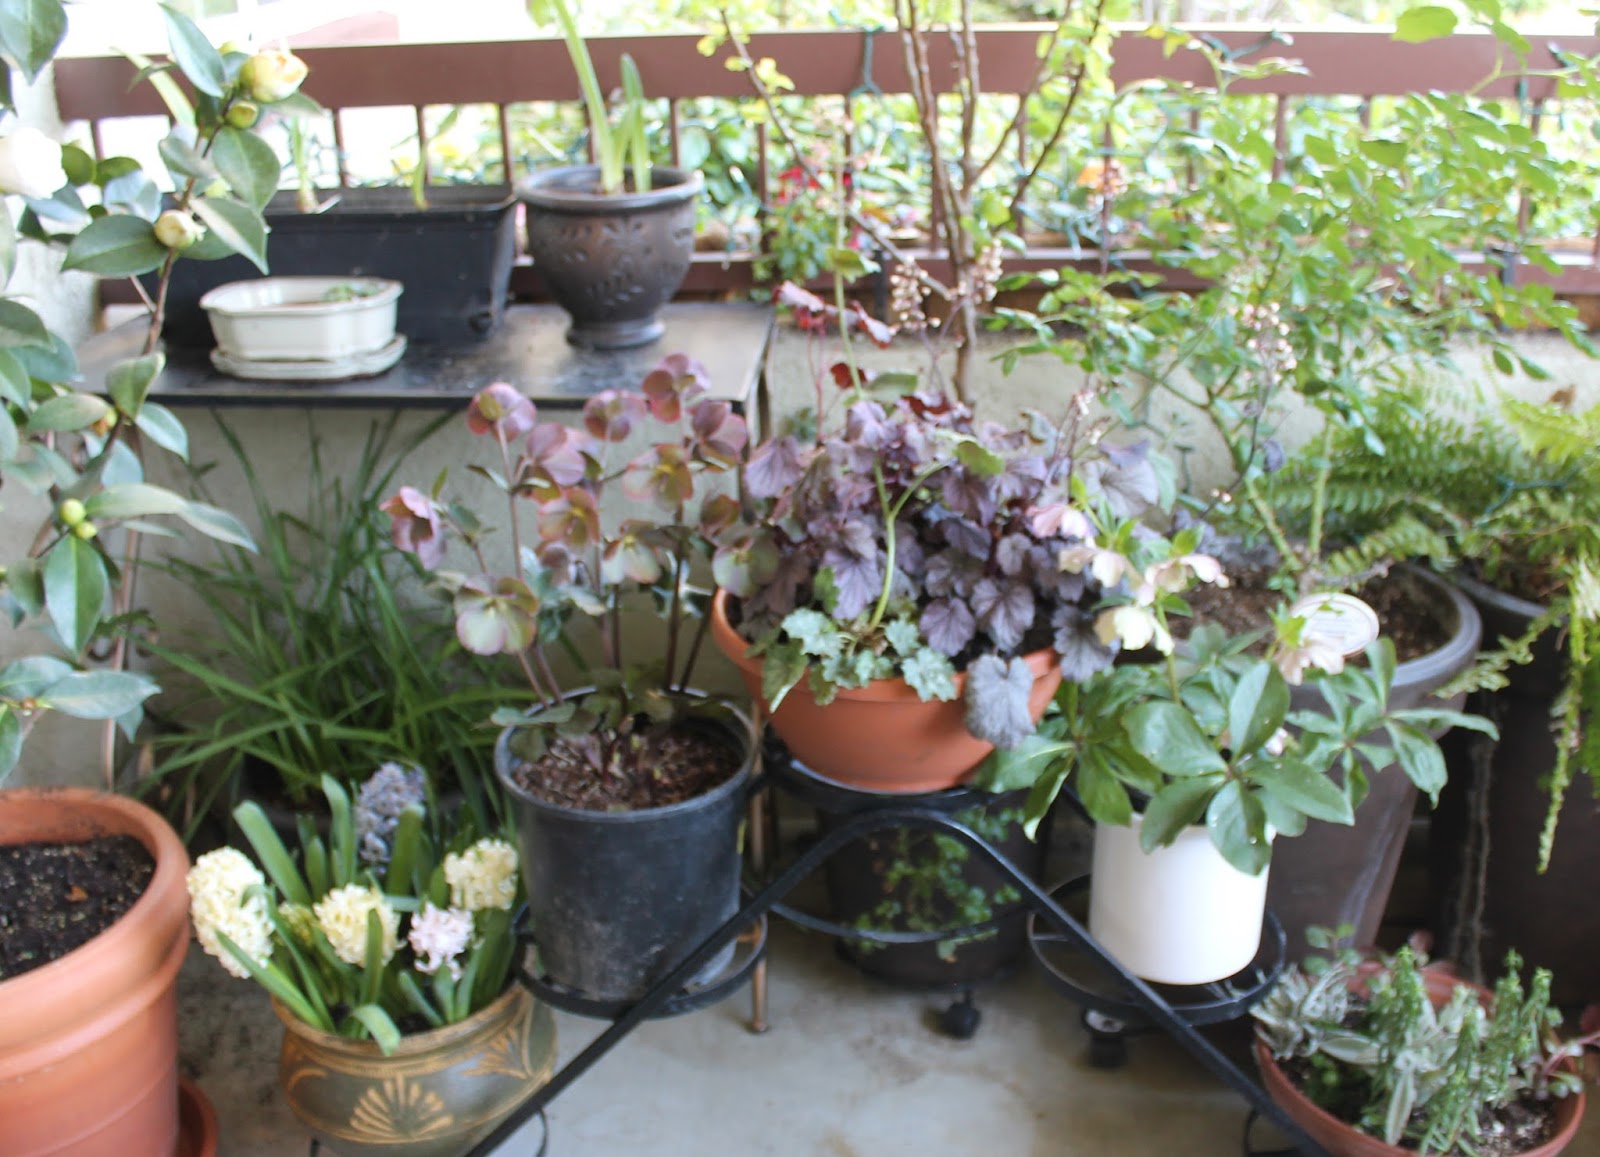
The perennials we've added include a couple of hellebores (Lenten roses) and a pot of heuchera (coral bells), two of my favorites from New England. I loved them in our cottage garden in Massachusetts and hadn't thought they could be grown in pots.
We also added some hydrangeas. In Massachusetts, we had a hydrangea tree growing in our deck garden and large shrubs in the butterfly garden. Once these florist specimens stop blooming, I plan to re-pot them together in a larger pot to allow them to grow so hopefully they will continue to bloom year after year.
I had seen some beautiful hellebores at Mid-City Nursery when we were buying the annuals for our window boxes. I passed them over with regret. They are one of my favorite spring flowers but I didn't have a garden in which to plant any. It was Tovah Martin at
Plantswise who suggested that I should try growing them in pots and grow them as houseplants. So, back to Mid-City we went where the one I really wanted was sold out but a deep purple and green and this white with deep mauve were still available. Next to them was -- guess what -- a pot of heucheras and those came home with us as well.
Emboldened, I looked for some of the other perennials that I sorely missed and created this gorgeous pot of bright blue delphinium to which I added pops of bright yellow in the form of primula (primrose). When the yellow calabrachoa are available, I'll be adding those in as well. That blue and yellow combination has always been a favorite in my garden.
 |
| Bright yellow primula make a wonderful contrast for the blue delphinium. Against the wall, a purple and green hydrangea blooms cheerfully next to the Meyer lemon tree. Apple mint and spearmint share the large pot that holds the tree. |
There are many things to love about container gardens. They are neat, require little to no weeding, and you can move and rearrange them at will. They also provide the benefits and the beauty of a flower garden in a very small space. For us, living in an apartment with a patio, this has been a wonderful way to be able to enjoy fresh herbs, citrus, roses, and cut flowers for the table.
Container gardens need to be watered more frequently but actually use less water, so they have an important place even in a yard where you are xeriscaping or have very limited land for raising plants and vegetables. Raised beds are an effective way to grow vegetables and maximize the crop yield in a small available space. While growing in containers and raised beds means watering more often, small frequent waterings use far less water than the deep soaking that the same plants in a large traditional garden bed require.
We water our containers exclusively from water recycled from showers and the kitchen. I joke that ours is the only kitchen in the complex with a watering can as a permanent fixture in the kitchen. I keep it near the sink and collect water from rinsing vegetables and dishes and from boiling vegetables and eggs.
When I'm washing dishes, it takes roughly one gallon of water to clear the pipe of cold water and to get water hot enough for cleaning and that water goes right into my watering can. I also keep a 5 gallon bucket in the shower to catch the cold water that runs before the water is warm enough for bathing as well as run off and some of the rinse water from the shower. Soap doesn't harm plants and is an excellent insecticide, helping to protect against some garden pests.
I've also been known to grab every available bucket and trash can and run outside to capture rainwater during a downpour. I understand that capturing rainwater is not allowed in some counties and states, so know your local laws regarding this. In Massachusetts we captured rainwater from drain-spouts using rain barrels and watered our garden exclusively using water from the barrels and saved from the kitchen as we do here.
Planting a container is no more difficult than planting a garden. It's just different. It requires a little bit of forethought and planning to have the right materials on hand. In addition to containers, you'll need a good quality potting soil, some peat moss, and compost or composted manure to fill the pots. Disposable diapers or
SoilMoist, small pebbles (they are sold by the bag at places like
Home Depot), and regular #4 coffee filters round out the shopping list.
A container garden starts, obviously, with containers. Some people prefer terra cotta pots, which are thought to hold moisture and keep the plants moist longer.
We have a mix of of terra cotta and plastic, and plastic pots set into decorative ceramic pots. Honestly, I don't find any difference among all of them in terms of watering needs, but the terra cotta and ceramic pots are very heavy. Even a large plastic pot is heavy once it's filled with dirt, however, so we put all of our large pots on rolling bases to make them easier to move for both rearranging and cleaning the patio. This is where paying a little extra for quality pays off. The bargain store wheeled bases don't hold up to the weight, the pots slide off easily, and the wheels get jammed.
Although it's a time honored tradition to add bits of broken crockery or pebbles into the bottom of a pot to facilitate drainage, I find that a coffee filter set into the very bottom of the pot, below whatever pebbles or other material is going to be used for that purpose, helps keep dirt from washing out and soiling the patio.

An important aspect of container gardening is to use the right mix of
potting material and to feed on a regular basis, since watering
containers washes out some of the nutrients and unlike the ground, there
isn't an available source of nutrients for the roots to reach for.
Most gardeners have their preferred mix of soil. For our roses
and most of our perennials and bulbs, I use an all-purpose potting mix that has moisture
control built in. Adding peat moss or vermiculite keeps the mixture
loose, so it doesn't compact and smother the roots. Mixing the soil 2:1
with compost or composted manure provides extra nutrients and enriches the overall planting
mix. I generally add one part of of peat to four parts of a potting soil-compost mixture for my regular general container gardening soil recipe.
Container gardening really is a place where one size doesn't fit all. I used a special potting mix designed for acid loving plants when we potted our camellia, and I also used commercial mixes for some of our other succulents and orchids.
Adding water-absorbing polymers below the root ball holds water and helps to keep the pots adequately moist between waterings. This can be done by using a product such as Soil-Moist or by opening up a baby diaper, and removing and using the water absorbent material it contains. I find it helpful to wet the diaper then peel away the plastic and set the "stuffing" low in the pot, a few inches below where the plant will set. It should be moist when you put it into the pot.

I also water the dirt in the bottom of the pot before I place the plant and remainder of the soil. This is especially important with tall narrow pots. You need to water the entire pot, otherwise, the bottom will dry out and make it hard for the roots to grow and develop. But this way, you don't need to drown the roots to get water to the bottom of the pot. And once it's moist, it's easy to keep it that way.
Once the containers are planted, soaking them well but slowly works best. When watering the first time, it's easy to either underestimate or to over-water and drown the roots so I water slowly over the course of a few hours, a quart at a time in the large pots. Honestly, it's a guessing game, but I water until I see a bit of run off into the saucer under the pot and then not again for a week. Then I make sure to give each large pot at least a gallon of water over the course of each week.
 |
| The traveling marker moves from pot to pot as I water. |
Watering is easy when you get into a routine. On a daily basis, after I do the morning dishes, I take the water recycled from the kitchen and showers and start at one end of the garden and work my way around, watering a couple of pots at a time, and marking with a small garden ornament where I left off watering each day. Then, the next day I pick up where I left off.
Feeding pots grown in containers is as important as watering them. I use specific plant foods formulated for each type of plant to
maximize the nutrients in appropriate amounts. Everything gets fed the same day at the same time. Otherwise, I lose track and it's easy to overlook some of the pots. Since it's easy to
overfeed, I tend to feed a solution diluted by a third every other week. I mix the fertilizer according to the package directions and then dilute and feed according to package directions. Then I continue with my regular watering.
We have window boxes edging our patio wall and they are
filled with annuals, perennials, an occasional herb, and miniature
roses. Over the course of the seasons we add plants to those that have
finished blooming for the season and gone to seed. Once it gets too hot for the pansies and the ranunculus
fade, I'll switch them out with bacopa, calabrachoa, snapdragons, and
miniature mums.
One of the things I find the most fun about container gardens is the opportunity to add other plants to the mix for color and variety. I use every gardening surface for growing herbs and bulbs and colorful annuals and perennials.
Mint and some bulbs grow with the Meyer lemon, and I routinely put summer annuals and extra herbs in with the roses.
Popping up on the right are a pair of Belladona Lily bulbs (
Amaryllis belladonna). They should send up shoots of small, medium pink fragrant flowers mid-summer. And that small little nub poking through at 9 0'clock is a hardy orchid,
Bletilla striata, also a summer bloomer.
 |
| Herbs share space with a miniature rose. |
I have a small Earth box where most of our herbs grow. Oregano, onion chives, and rosemary are doing well. I will be adding some thyme to replace the plant that the snails devoured but basil requires a larger space than the box provides.
When it's time to plant it, it goes in the pots with a couple of the roses, and this year may even share space with the camellia. I can't seem to grow enough of it and I am constantly battling the snails who seem to seek it out and regard it as their personal favorite.
Speaking of snails brings up the issue of garden pests.
Unfortunately, container gardening doesn't eliminate garden pests and in fact, can make the plants somewhat more susceptible, since at least on our patio, they are grown densely and in such close quarters. Thrips, aphids, and snails and slugs are just as happy munching on container gardens as they are those that grow in a traditional garden. And the damp weather brings with it the constant threat of powdery mildew.
The rain has brought out a plethora of snails and we are constantly picking them off the plants and pots. Hopefully, some diatomaceous earth will dramatically reduce their numbers this week. I find the use of DE to be my most effective all around garden best treatment. After a single treatment of our roses with a systemic insecticide mixed with rose food in the spring, I rely on natural products from the pantry to treat our entire garden for and protect against garden pests. In my next post I'll give details and recipes for all natural garden remedies to keep your plants blooming at their best throughout the year.
Now some photos of the blossoms that are currently brightening our patio:
 |
| First to bloom this spring were the paperwhites (Narcissus papyraceus). I planted a large pot of them and the first blooms opened in early February. The cool winter nights promote a longer bloom time and the blossoms continued until a couple of weeks ago. Currently, the green leaves are nourishing the bulbs which will be dried and put aside for next winter. |
 |
| Painted daisies and blue and purple hydrangeas add cheerful pops of color to the spring garden. Later in the season, pots of coleus and zinnias will do the same. |
 |
| When I first planted the hyacinth bulbs, I didn't expect them to do much and weeks passed with no sign of them poking through the soil. I had neglected to stratify them; most spring bulbs require chilling in order to sprout and bloom. I was pleasantly surprised to see that every one of them eventually sprouted and sent up a flower spike. |
 |
| The pink ones bloomed first, pale blooms that darkened to a deep mauve. The purple and yellow ones followed. The fragrance of hydrangeas is one I think of as an "acquired taste". One friend thought the perfume coming from the patio when the blooms were at peak was dog urine! Steve and I love the fragrance, though strong, although when the blossoms start to pass, the perfume turns bitter. I generally clip the aging flowering stems back before I have to so that I can enjoy the fragrance of the new blooms. I also stagger the planting of the bulbs so that I can enjoy them longer. Another pot will be ready to bloom just as the last of these are fading. |


 |
| I was surprised to see one of the pink hyacinths send up a second flower spike from the same bulb. You can see the fading, darker bloom to the left and a new, pale pink shot on the right, both coming from the center of the bulb. A few of the white bulbs we had in our garden did this, but this is definitely not the norm for hyacinths, which typically send up a single bloom spike per bulb. |
 |
| The plants in the window boxes are blooming enthusiastically -- white violas and pink miniature roses... |
 |
| ... and primula with cyclamen. On the patio, the Meyer lemon bloomed almost non-stop all winter. We only recently harvested the last of this year's crop of lemons. |
 |
| In another box, begonias and ranunculus bloom together alongside a box of pansies (below). |
Some of the other beautiful blooms in our boxes and patio...
 |
| Camellia blossoms |
 |
| White primrose |
 |
| This primrose has a deep coral bloom with a bright yellow eye |
 |
| I love the unusual coloration of this beautiful hybrid ranunculus. Ordinarily, I only see them in solid colors. At left is a white primrose. |
 |
| The bright and cheerful yellow primrose are the perfect foil for the blue and white spires of delphinium. |
 |
| Fairy lights make evenings on the patio magical... |
 |
| ... and show our friends and family where to find us. |