Monday, May 30, 2011

A Day of Remembrance: Honoring the Crew of Black Hawk #517

While Veteran's Day is the day we celebrate all soldiers who have served our country, Memorial Day is the day we remember and honor those soldiers who made the ultimate sacrifice for freedom and died defending our country and its ideals.  

This year, Memorial Day has very special meaning for us.

As members of Soldiers' Angels, we have been supporting soldiers who are serving in Afghanistan and Iraq for five years. In 2010, we adopted an entire unit of 35 soldiers, members of the 101st Airborne Combat Air Brigade, 101st Airborne Division, soldiers from Fort Campbell, Kentucky who were based at Kandahar Air Base in Afghanistan.

In addition to the soldiers of the 101st, we also supported another 12 soldiers, members of a combined joint special operations task force serving in Tarin Kowt that the 101st CAB brought mail and supplies to.  We sent dozens of letters every week and more than two dozen care packages every month, including complete meals, toiletries, and snacks for the special forces soldiers. We also sent each of our soldiers a Christmas stocking stuffed with goodies from their "Wish List". (That was a major production but we pulled it off!)

On September 21, 2010, the U.S. suffered one of the most devastating losses of the entire war when a Black Hawk helicopter, tail #517, crashed, claiming the lives of 9 soldiers and sailors. 

Five soldiers were members of the 101st and four were sailors, three of them Navy SEALs and the fourth, a Navy cryptologic technician assigned to a Naval Special Warfare unit. 

Despite not having met any of these soldiers or knowing them personally, this was very upsetting for us. We sent the soldiers of "our" units everything from shampoo to deodorant, tooth brushes and tooth paste to beef jerky, and cans of chili to Doritos, fleece blankets, socks and underwear, and lots of candy. We corresponded with them, have a scrapbook full of pictures and emails, and we held every one of them very close to our hearts.

Capt. Nick Craig
Our main contact for the unit during that time was Capt. Nick Craig, a Black Hawk pilot who flew with several of the soldiers who were killed and helped in the recovery process. Nick has been given the honor of designing the memorial that will be built at Fort Campbell to honor the soldiers who died. We plan to attend the unveiling of the memorial when it is dedicated. 

Nick has also been tasked with raising the funds required for the memorial. We don't often ask our friends to donate to a cause that we believe in, but this is one time that we are asking all of our family and friends to help this most noble cause.  Please make a donation to help fund the memorial HERE. Nick has posted some video and links to some of the news reports of the crash if you aren't familiar with it. 

When he was first asked to design the memorial, Nick sent us photographs of memorials that inspired him and described his plan for this monument. He has created a design that will be a wonderful tribute to all of the soldiers and sailors who died. Please help us to help his dream become a reality.


Today we are remembering and honoring the following soldiers and sailors with flags placed around the circular rose and cottage garden in front of our home.  The roses and peonies are budded and we hope they begin to bloom this weekend. 


The soldiers and sailors we are remembering are: 


Chief Warrant Officer Matthew G. Wagstaff
Sgt. Marvin R. Calhoun Jr.
Chief Warrant Officer Jonah D. McClellan
Maj. Robert F. Baldwin
Staff Sgt. Joshua D. Powell
Petty Officer 2nd Class Adam O. Smith
Lt. Brendan J. Looney

Senior Chief Petty Officer David B. McLendon
Petty Officer 3rd Class Denis C. Miranda

Here is our garden tribute to the soldiers and sailors who died on September 21, 2010 in the crash of Black Hawk Tail #517.


Please make a donation in support of the memorial for these soldiers and sailors.  You can click HERE to make a donation.


Sunday, May 29, 2011

Garden Visitors: Baby Robins


Several weeks ago, we began noticing that a pair of robins was spending a lot of time in our yard.  Although the trees in and around our yard are full of songbirds, we rarely have such close contact with them. Since they're so "people shy", I take most of the photos of birds in our yard with a telephoto lens.

Birds come to feed at our bird feeders and fly past as they go from tree to tree, but it's unusual to see them perched on the garden structures, fence and trellis.

Then, one weekend, Steve noticed robins flitting past the sliders from the family room which open onto a patio under the deck. From his vantage point just inside the glass, he became concerned that they might accidentally strike the sliding doors.
When he peeked out, he was amazed to find that the robins were building a nest atop a folding screen that had been left leaning against a portable outdoor potting sink.

We  store most of yard furniture and gardening tools under the deck for the winter and had only started moving the furniture out for spring. It usually hides a tool corner, but while moving things around and neatening up, the screen had been left in a precarious position, leaning against an outdoor portable sink.

Once the robins started building their nest, we felt we couldn't move it and hoped it would hold steady until their babies were able to leave the nest.

For several weeks, the robins stayed close to the nest, flying out and about the yard and the garden, bringing back twigs and leaves. They completed their nest and then about two and a half weeks ago, we noticed the mother robin was spending a lot of time in the nest. In fact, she would only fly off if someone approached.

Eventually we realized that the mother robin perched in the nest almost all the time, flying off for a few minutes hear and there or if someone approached. And even then, she rarely left the yard. We hesitated to try and see how many eggs; every time we stepped within ten feet of the screen on which the nest was perched, the robin flew off.

Out of deference to the robin family, our son posted a sign on the sliders, asking guests not to use the doors which opened next to the screen and we all tried our best to avoid the area and not disturb them.

Both the male and female stayed close by and spent a lot of time flitting around the yard, allowing us to get some excellent pictures of them without benefit of a telephoto lens.

The male and female perched on the fence not far from where their nest is.
Capturing a picture in flight this close, with my regular lens, proved quite a challenge.
Now we know how the stains got on Buddha's face!

Two days ago, we heard peeping coming from the patio and saw a tiny beek poke up over the edge of the nest. When the mother bird flew off to feed, we finally stood on a nearby chair to try to get a photograph, not an easy task as the nest was close to the rafters supporting the deck.

With the lens aimed down on the nest, it took many tries but I was finally able to get a great shot of the new babes.

Robins usually lay four eggs in a clutch. I don't know if there are two other eggs beneath these chicks, or if she only laid two, but we can only see two tiny babes.

Again today, perched on the kitchen ladder, we were able to get some images of the babes after the mother bird flew off for a bit.

Today they were sleeping when we photo'd them, but shortly after that (after the camera was put away, of course), we saw the little beaks once again peak up over the side of the nest as they chirped and called for her.

Unfortunately, I will be traveling this week and can only hope that they are still there when I return. I so want to see their mother lead them from the nest!

Added Sunday evening:  Earlier this evening, the mother flew off to get some food and we saw the little ones looking for her to feed them. We were able to get this picture while she was out and about getting food.

Looking for their mom to feed them.

Garden Pests: Those Dreaded Red Lily Leaf Beetles

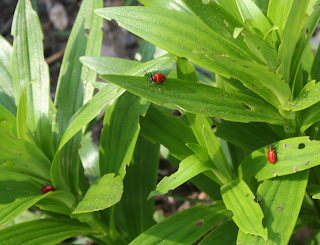
When I saw my first red lily leaf beetle (RLLB),  Lilioceris lilii, in 2006, I had no idea how much devastation they would ultimately wreak in my garden. Without toxic chemicals, it is very difficult to keep them in check, and since we pride ourselves on not using chemical pesticides in our gardens, it sometimes seems as if we have been fighting a losing battle. [Read more about our methods HERE.]

The RLLB is an oval beetle with bright red elytra and hindwings. You can't mistake it for the sweet and helpful lady bug. Lady bugs are smaller, rounder, spotted, and have a larger head in proportion to the body than the RLLB.
The lady bug (L) should not be confused with the Red Lily Leaf  Beetle (R)
The RLLB has a special fondness for Asiatic lilies and fritilaria, so much so, that I have dug up most of ours and relegated the remains of them to the compost pile.

Once one of my favorite flowers, we had Asiatics covering the entire middle of the island that surrounds our mailbox and interspersed them with the daylilies as well.

But when lilies aren't around, contrary to popular opinion, the RLLB's will attack other plants and I have found them munching away on daylilies (which are not true lilies and are not usually one of their favored plants to attack), peonies, phlox, and roses.

I usually try to stay ahead of them with aggressive spraying beginning in April, but with so much rain this spring, that didn't happen and we are now paying the price for that. Since we have only a few lilies remaining, for the first time ever, this spring I was dismayed to find them attacking one of our clematis.

An unpleasant find: red lily leaf beetles on our Sweet Autumn clematis


The most eco-safe method we've come up with to deal with these pests is frequent spraying with Neem and also spraying the soil around the plants with a 10% solution of ammonia. The ammonia kills larvae that may have fallen down onto the soil. Some of the Bayer products reportedly kill RLLB's on contact, but I have not found that to be the case. And since the pesticides in the Bayer products are toxic to fish, we can't use them here in any event.

One key to successful spraying is to spray under as well as on top of the leaves. The RLLB deposits its eggs on the under side of the leaves where they hatch into voraciously hungry larva that escape notice because they cover themselves with dung.

Not only do the larvae do more outright damage to the plants than the adult beetles, if you don't adequately deal with them, you'll be dealing with more of these little nasties in short order. First they'll eat until they defoliate your lily and then they'll lay more eggs and well... the process continues. Relentlessly. But be sure to use Neem either early in the morning or later in the evening, before or after the bees will be out collecting pollen and nectar as it is toxic to bees..

I mix the Neem according to the directions on the container and then add 1/4 cup of canola oil and 3 Tablespoons of clear dish soap (like Seventh Generation) per half gallon. I rarely need more than a half gallon of spray at a time, since our lily collection is all but gone at this point, but I spray everything around the lilies, since my experience is that these hungry horrors will eat anything and everything if the lilies aren't readily available.

One final note:  Picking them off the plant and killing them is easier said than done. When you attempt to pick them off, they curl up reflexively and drop onto the ground under the plant, back side down with their black belly facing up making them impossible to see. I've had a bit of luck sliding a sheet of white paper on the ground under the plant with sticky tape attached to it (sticky side up) or even smeared with petroleum gel or thick shampoo. (The cardboard from pantyhose works well for this). Shake the leaf or knock them off with a stick or tweezers and they get stuck in the petrolatum or tape. Fold the mess up into a plastic garbage bag and you're done.

Saturday, May 28, 2011

Curiously Columbine.... continued

While I was photographing the columbines the other day, I saw some very tall (2-1/2 to 3 foot) plants in a small garden we have behind the gazebo. The plants had several stalks of buds that were still tightly closed, but they were some of the darkest buds I've ever seen -- some were nearly black.

Today I checked and they were blooming. The royal blue ones in the background are the same variety that we have in some of the other beds. The darkest ones in the foreground are actually even darker than the photographs demonstrate.... they're an incredible deep, dark aubergine.

So, if you can stand a few more pictures of columbines, here are some more of the tall royal blue plants and a deep, dark, nearly black purple.

The royal blue columbines are tall,  but not nearly as tall as the darkest ones which, in this photograph, are on the right and to the rear.


Friday, May 27, 2011

Curiously Columbine

A favorite in our spring garden is Aquilegia, more commonly known as columbine. A staple of the woodland garden where they grow naturally, columbine prefers a shady or partly shady location with rich humusy soil, but this prolific self-seeder has found its way into our sun gardens where it grows with equal enthusiasm.

Columbine blooms in a rainbow of colors: red, pink, white, blue, and purple, and less frequently, yellow. It's often a bi-color, usually with white. The blooms of some cultivars are held erect so the blossoms face you, while others droop almost bell-like, making it hard to see and photograph their delicate structures. All have a typical appearance with petals that have classic spur-like extensions and a sometimes honeycombed appearance to the center of the blossom when the inner petals are deeply curved. The stamens can be either understated or prominent and showy, depending on the variety.

The heavily lobed leaves grow in clumps, but since they are held on longish stems, they have an airy appearance. In the early spring garden, the leaves are a pretty blue-green to medium green backdrop for some of the later blooming spring daffodils and tulips.

As the larger summer perennials fill out, columbine takes a back seat to the showier larger-leafed hostas, salvia, coral bells, and other perennials and enjoys relative obscurity in the summer garden, providing just enough ground coverage to double as something of a ground cover and help keep weeds at bay.

Because it self-seeds with such abandon, and because the production of seeds saps the energy of the plants, it's a good idea to snip the stems after the blossoms begin to fade, letting only one or a few develop seeds which you can allow them to sow naturally or save to sow indoors or out yourself.
Like many plants that grow in northern climates, columbine seeds need to be cold stratified in order to germinate. That is, they need a period of several weeks of cold, wintry temperatures to stimulate spring germination. Storing them in a cold shed or garage over the winter for spring planting is a no fuss way to accomplish this, but they can also be tricked into germinating by cold stratifying them in your refrigerator for several weeks.

Just prior to fully opening, the buds resemble shooting stars or little rockets.
The inner petals are heavily cupped and give the classic honeycomb appearance to the center of this white columbine blossom.
A deep scarlet, this blossom has a creamy white center. This variety is one of the shorter cultivars, with the leaf mound about 6 inches tall and the blossom stems barely reaching a foot in total height.
Partially open bud.... the inner petals are squared off and a creamy white.

The fully open bloom.
The drooping form in the garden doesn't allow you to see the beauty of the deep royal blue blossoms..
The face of the royal blue blossom
This deep purple and white bicolor is one of the tallest plants, reaching nearly three feet, thrives in full sun in one of the perennial beds in the formal garden. The plant is shown below.
Like its royal blue cousin, the blooms of this purple coumbine face downward.


This red columbine, "Red Star" is medium height, about 2 feet, and like the taller royal blue, spreads prolifically throughout the garden.
Another dwarf variety that barely reaches 10 inches in height, with dark red blooms that cover the densely  mounded plant. I believe this plant is a hybrid that self-sowed from other cultivars in this bed.

Columbine makes an unusual cut flower display. Buds open poorly if at all once they've been cut, so choose newly opened blooms for an eye-catching bouquet that will last several days.  Here, the stems are gathered into a narrow bud vase.
Planting several varieties can have interesting results in subsequent years. Columbine hybridizes freely, so if you want a specific color, plant only that color. And since even that won't guarantee that they will all produce seeds that are "true" to the parent, snip the stems before seed pods form to encourage the plant to develop a healthier root system and leaf cap rather than putting its energy into seed production.

If you plant a variety of colors like we have, what you'll find when they bloom next spring will be anyone's guess. Fortunately we enjoy surprises and the dwarf solid red is one of those surprises.

Definitely the result of self-sowing (it was growing along the edge of the bed in the midst of the ground cover), I moved it to a spot where it would have room to grow and develop. I was surprised when it developed into such a petite plant, covered with small, perfectly formed, solid red double blooms, unlike any other columbine in the garden.

I plan to let this plant produce a stalk or two of seeds to sow in the house next winter, hoping that some will produce more of these lovely compact plants. They would make the perfect accompaniment to the dwarf white rhododendrons we have along the walkway to the shade garden.